From the very first open of the raw recording until the final export into individual note I always work with a resolution of 32 bit floats of the original recorded samplerate as quality setting in Audacity. This is done to eliminate any possible degradation caused by multiple opens/exports. First at the very last step – when it's time to export into individual files – I select the target bitdepth and samplerate.
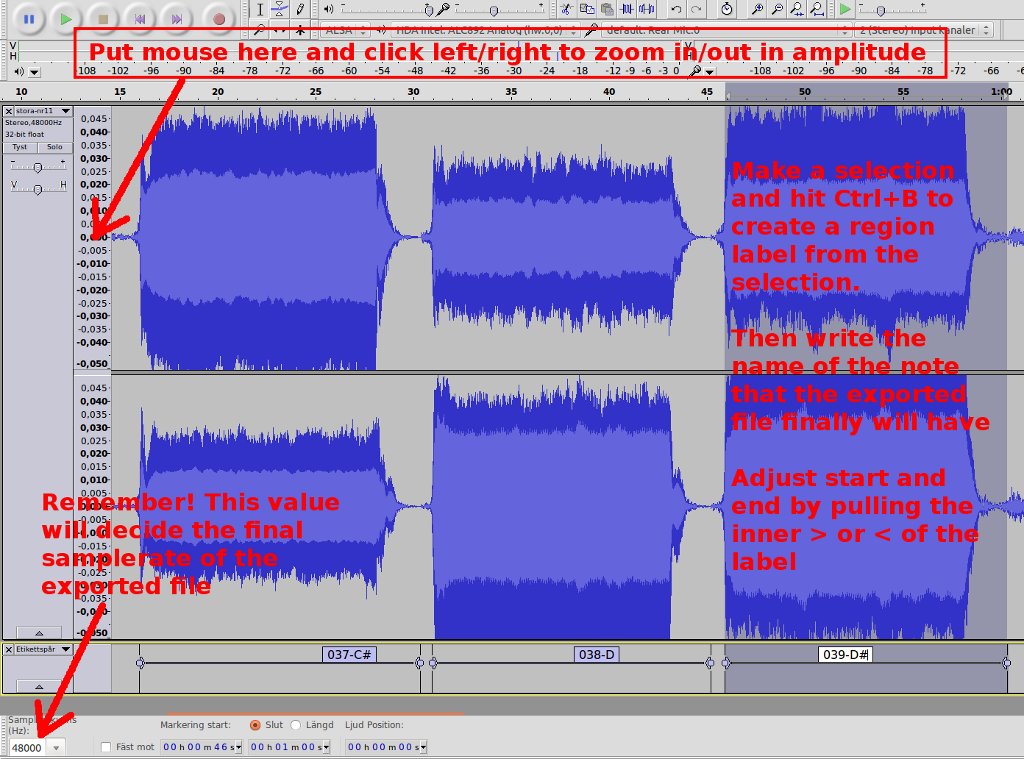
Remember that dropdown box to the low left? That's what will decide the final samplerate of the exported file! Be sure that it's set correctly for your preferences. The format and thus bitdepth will be set in the export dialog. The general settings for dither will apply, but even if it's rumored that the shaped dither is fixed in Audacity 2.0.5 I still set it to none.
Anyway, in the work to cut up the noise reduced file into individual notes you have great help if you learn the keyboard shortcuts available and also set up some of the not specified ones. After having cut many thousands of samples every single move with the mouse starts to count! It's then that you'll be thankful to know how to use the keyboard shortcuts! Go into the Edit menu, Preferences and select Keyboard, scroll down the list and learn/set the combinations you like. The ones I use the most are (do note that not all of them are set by default!):
| New | Ctrl+N |
| Copy | Ctrl+C |
| Paste | Ctrl+V |
| Export to multiple audiofiles… | Ctrl+Shift+L |
| Add label from selection | Ctrl+B |
| Move cursor to selection beginning | Ctrl+Left |
| Move cursor to selection end | Ctrl+Right |
| Zoom in (in time) | Ctrl+1 |
| Zoom out (in time) | Ctrl+3 |
| Play loop | Shift+Space |
| Plot spectrum | Ctrl+Shift+P |
| Eq | Alt+Shift+E |
| Fade in | Ctrl++ |
| Fade out | Ctrl+- |
The process will now differ slightly depending on how you have sampled the instruments (with multiple attacks, releases etc) but I generally start with the same kind of sounds I'll export to individual samples – be that the attack/sustain sections or the different releases.
 I coarse select the first notes sound part of the desired type then hit Ctrl+B to create a region label of the selection. The region label I name to what the final file name will be, for instance 036-C. Then I move to the next sound of the same type (eg. next note) and repeat until the whole file is done.
Then it's time to fine adjust start and end of every note. This is a important part that will require lots of trial and error, always listen many times to an adjustment until you're happy with it. Especially the starts of the attack/sustain sections are important to get right at this stage.
For this I drag the tracks to almoast cover the whole screen height just leaving enough room for the label track below them. Then I move the cursor to the amplitude scale just to the left of the tracks and left click at the center to zoom in on amplitude as much as I can, if you want to zoom out you can right click instead.
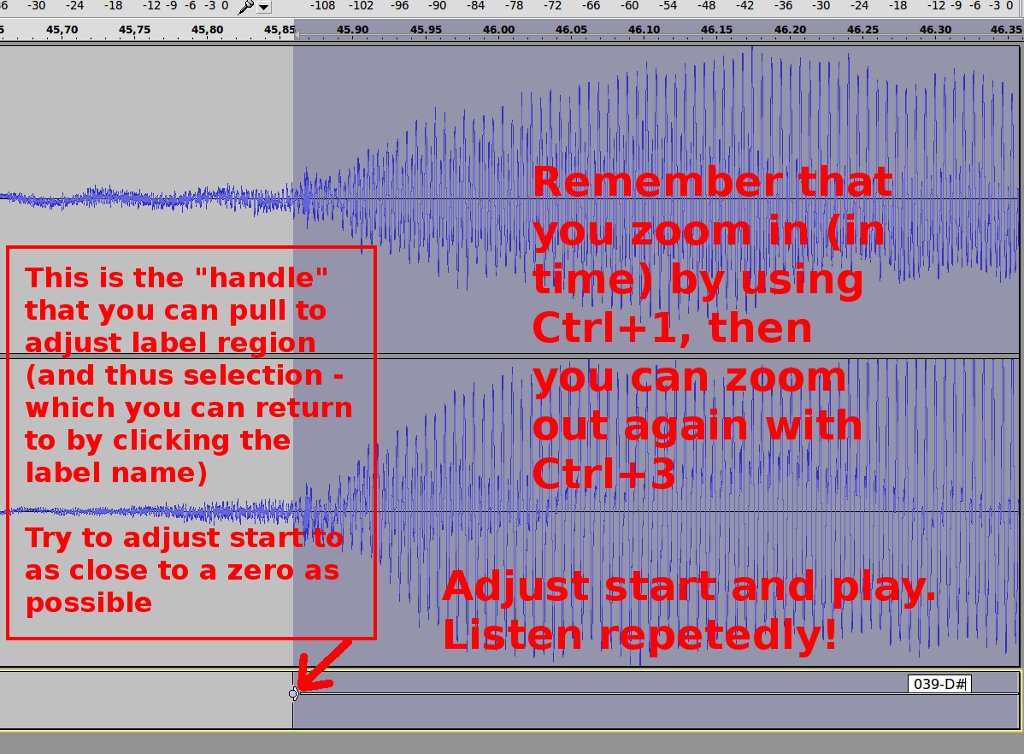
 Then I click on the first notes label name to select it. I use Ctrl+Left to move the cursor to the beginning and then Ctrl+1 to zoom in (in time). To adjust the start I drag the > handle of the region label end marker, it's important to not click and drag the round part that would move the whole selection instead. I repeat adjusting the start and zoom level and listen to the result until I'm happy. Preferrably I try to get both channels at a zero crossing in the start if possible. If it's not, then it's always possible to make it start at zero by applying a short fade in but that's mostly a last resort.
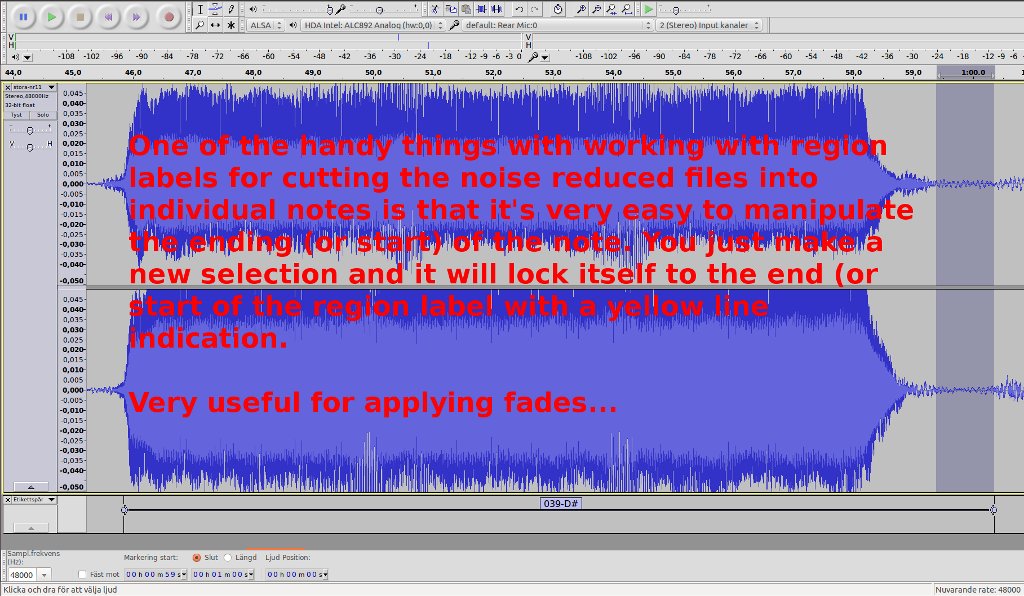
By clicking on the label name it's possbile to select the whole region label and listen to how it sounds as a whole. By hitting Ctrl+Right I move the cursor to end and adjust it in similar way to the start. Even if this is less crucial than the start I normally try to get all the natural reverb intact by listening intensely for the correct place of the region end marker. Sometimes it's necessary to add a fade out to hide some background defects but I generally try to get it at the very end of the reverb tail. It's important to try to get all the releases sound as natural as possible!
When this is done for all the not es (sounds of the same type) I export them as multiple files using the label name as file names (remember to use Ctrl+Shift+L). Be careful to set the correct export options for the final file (file type/format) and path. Then it's just to export them all, as I normally disable the metadata window in the settings the export is a quick business.
Then it's just to delete the label track and (if you have multiple samples for every note) repeat the process for the next type of release or the next attack/sustain section type if you want to have them in different folders… As I normally have at least one full attack/sustain section and two shorter releases in my more recent samplings that means at least two more passes! On some there are even more. The different files I place in different folders describing their nature.
A sensible plan of sample storage is otherwise the one used by Sonus Paradisi. All attacks are kept in the main folder for the stop/rank. The main sample is named like 036-C. Any further attacks of the same tone will be named like 036-C_2 or something similar. All additional releases will be put in subfolders named like rel00150 where the rel indicates that the folder contain releases and the numbers afterwards the amount of milliseconds the key max can be held to use that release sample. Observe that there must be at least one default release sample that will be used if the key is held indefinitely. This is normally not necessary to write, but if you have a release folder named rel99999 that usually should be interpretated as MaxKeyPressTime=-1.
